As a property manager with so many different tasks to facilitate in order to run a successful operation, there’s no reason you should be spending your time sending the same emails over and over again. Guesty’s Automated Messaging tool puts guest communication on auto-pilot, ensuring all messages are sent exactly when you need them to be.
Watch the video below or continue reading to learn more about this important feature.
Video: Creating Automated Messages – Guesty Help Center
What are Guesty’s Automated Messages?
Guesty’s Automated Messages are a sequence of customizable messages to be sent at specific stages of the booking cycle, be it after an initial inquiry, prior to checkin, during the guest stay or following checkout. They can be pre-set to include the name of the recipient and any other personalized information, pulled from the guest or reservation details on your guesty dashboard.
Creating a new Automated message:
Step 1: Create a template
To create a new Automated Message, click ‘Listings’ from the menu bar at the top of your Guesty dashboard and select the relevant listing. Click ‘Automation’ and then ‘Auto-Message.’ You can then choose from a selection of default templates, which can be edited, or opt to create your own.
Step 2: Set conditions
Then you’ll set the specifics of the message like its internal names, when it should be scheduled for and sending conditions that dictate the circumstances as to when it should or should not be sent. Conditions can include the channel through which the booking was made, the status of payment or the number of days in advance that the reservation was booked.

Step 3: Select relevant listings
Next, you’ll select which listings to which to apply the auto-message. You can choose these individually, apply filters to select listings in certain locations or with other commonalities or opt to select all of your listings, with the ability to exclude specific ones. The message will automatically be applied to listings that qualify, even if those listings are added after the template has been created.
Step 4: Choose how and to whom the message should be sent
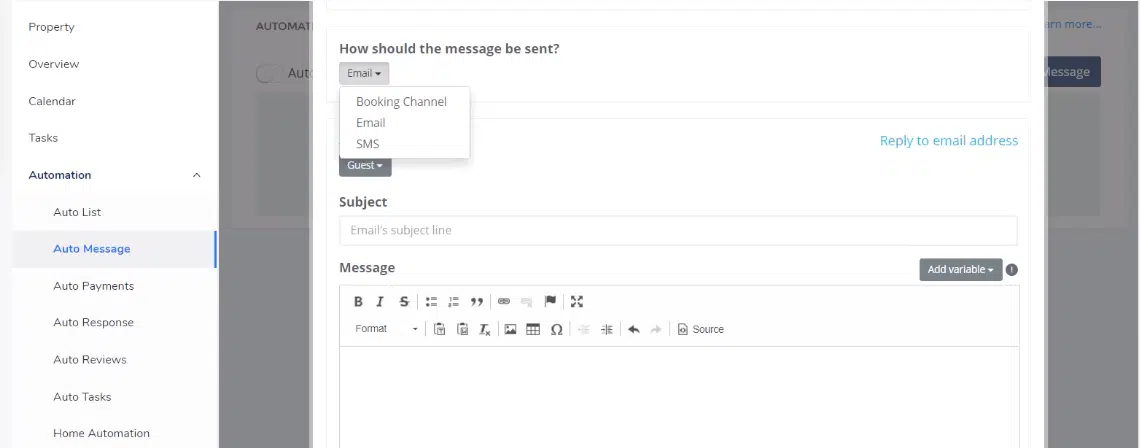
Determine whether you’d like your automated message to be sent via email, SMS or the booking platform. Then select from a list of categories of potential recipients, including guests, homeowners or team members.
Step 5: Add the message content
For automated messages set to be delivered via email, you’ll be prompted to create a subject line and body text, and can choose to add images, links, HTML code and more. For messages set to be sent through other channels, you can simply provide plain text.
Step 6: Customize the message
Select ‘Add variable’ to insert a placeholder that is automatically replaced with the relevant information when the message is sent. Variables include guest names, check-in times, listing addresses and more.
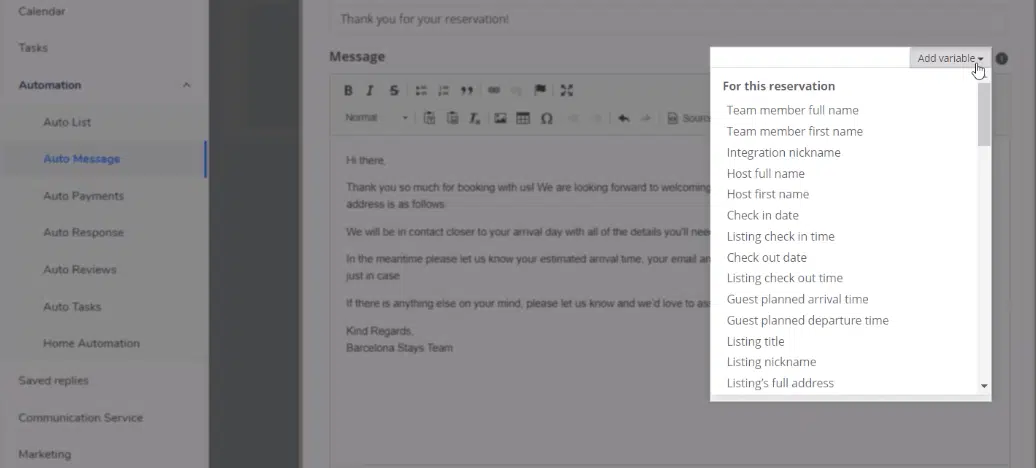
Click ‘Save,’ and then you’ve completed the process, but can navigate back to the template to edit it at any time. Just be sure the Automated Messages toggle is turned on for each listing to which you wish to apply an Auto-Message.
Want to learn more about using Guesty to manage your multi-unit listings? Check out our Help Center, where you can find step-by-step guides to setting up and editing Auto-Messages.


